JDP Motorsports
Supporting Vendor


Posts : 36
Join date : 2011-09-01
Location : Sandy, Utah
 | | Subject: JDP Motorsports' 2010-11 SS Heater Hose 2012 Update DIY Wed Nov 30, 2011 11:16 am | |
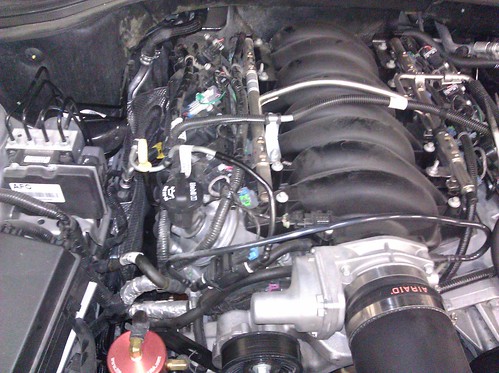
| The JDP Motorsports 2010-2011 Camaro SS Heater Hose 2012 Update is now available, and here is the do-it-yourself instructions for installation :headbang: This relocation of the heater hoses from on top of the intake manifold to the passenger frame rail is beneficial for a couple reasons. It keeps the hot hoses from possibly heating the intake manifold and therefore heating the intake air, which reduces power. It also makes the engine bay look much more professional and clean without the awkward hoses flopped on top. Tools needed: Catch bucket or similar Long needle nose pliers or similar Long hose pliers (if available) Knife (if needed) 10mm 1/4" deep socket 1/4" ratchet
- Remove the engine cover (if present) by removing the oil filler cap, lifting the front of the cover, and pulling forward and up. Reinstall oil cap.

.
- Locate where the heater hoses attach to the engine (on the passenger front of the engine). Place a bucket or something underneath this area to catch the coolant that will fall from this area. Approximately 1 gallon of coolant will be lost. You can reuse the coolant, but may get contaminated by debris on the engine and subframe, so it is advised to fill with fresh coolant.

.
- Using long pliers or clamp pliers, release the clamps on each hose and pull back approximately 2 inches from the end of the hose. You can also choose to cut the hoses off, but will obviously be worthless if you ever wanted to go back.

.
- Using some adjustable pliers twist each hose to break them loose from the water pump.

.
- Once they can twist without much effort, carefully and slowly (to avoid a large mess) twist and pull the front hose off, you can adjust how far the hose comes off to meter the flow of coolant. You can let a bit come out, then put the hose back on, and check underneath the car to determine where the coolant falls, and if your bucket is catching as much as possible.

.
- Once coolant mostly stops draining from the front hose, remove the rear hose in the same manner. Some coolant will come out, but not as much as before.

.
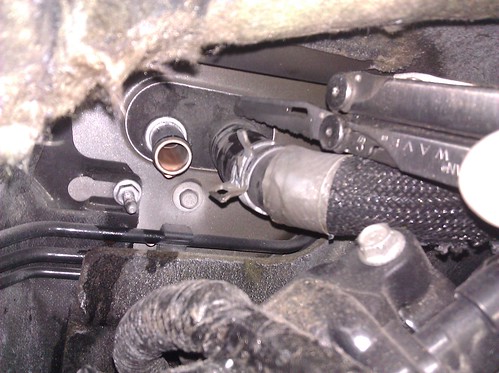
- Now that this end is detached, move to the firewall where they attach to the heater core pipes. With some long pliers grab the outermost hose's clamp and move it to a manageable location to release and pull it back a few inches, similar to the engine side.

.
- With that clamp away, again try to twist the hose to break it loose from the pipe, then remove the hose. Some coolant will come out, but not very much. Be very careful though, you do not want to crush or deform the pipe, it is very soft and will easily do so. If you have them available, some long pliers with rounded end works great.


Often times, these hoses will be very tight and you will not be able to break them loose this way, without damaging the heater core pipes. The only way around this is to cut the hoses off. Make a slit in the hose length-wise from the end of the hose down a couple inches. Don't cut the heater core pipe, but get as much through the hose as you can, then it will be much easier to break the hose loose.
.
- Once the outer hose is gone, do the same thing to the inner hose, then remove the old heater hoses. You will most likely have to disconnect the evap hose that goes to the passenger side valve cover, and route it out of the heater hoses.
.
- Now, on the passenger side frame rail, there is a heat shield with a few nuts and retainers holding it down. Remove the 2 10mm nuts on the forward end of it (one on top, and one approximately 6 inches beneath it), and remove the black plastic retainer at the back (it can be removed by twisting it counter-clockwise to unscrew it from its post). With these removed, pull the heat shield away from the frame a couple inches, towards the engine.

.
- Take your new heater hoses, and on the bracket, there is a little tab sticking out. Bend that down flush with the rest of the bracket.
.
- Find the fuel line and evap line that go from the engine to the passenger side frame rail, connected down into more pipes. Do not disconnect these, but on the evap hose (the one forward on the engine, connecting to the rear hose on the frame), pull it out of its little clasp, right near the dipstick, which will allow the evap hose to be raised.


.
- Now grab the flexible portion of fuel line, and the loosened evap line, and gently pull them up, and slide the new heater hose assembly into place, from the front of the car, under both these hoses, and back as far as you can to the fire wall.

Set the heater hoses down to rest on the frame rail, between the heat shield and piping, and release the evap and fuel lines. (The forward most rubber hoses on the new heater hoses will be bent upwards.) Reattach the evap hose to its clasp.

.
- Now take the lower rubber heater hose and route it underneath the various wiring harnesses to be free in the open, level with the rest of the heater hose assembly.

Now do the same with the other rubber hose.

Ensure they are both underneath the wiring harnesses, and are not tweaked in any way. Both hose ends will naturally now be resting near the water pump hose connections.
.
- On the old heater hoses, remove the hose clamps and attach them to the new hose assembly, in their respective places. One hose of the heater hoses is larger than the other, as is the clamp, so ensure you place the correct clamp on the correct hose.

.
- Now attach the new hoses to the engine and heater core pipes in their respective places.

Secure each hose in place by moving the clamp near the end of the hose, and release them.


.
- Now check fitment of the assembly. Make sure no rubber portion is bent, kinked, or tweaked, and that they are free from anything which may cause problems. Take the heat shield and move it into position and adjust the heater hose assembly as needed. The perfect location would be so the heat shield is only touching the metal parts of the heater hose assembly, so it won't cut or wear through the rubber hoses.


.
- Once in proper place, reinstall the 2 10mm nuts and the plastic retainer (by screwing it back on) to hold the heat shield and heater hose assembly in place. You may need to adjust the heat shield in places to allow for the heater hoses. You'll want to make sure it is held in place tight, and no rubber hose is touching the heat shield.


.
- Now refill the cooling system with a 50/50 orange coolant/water mixture. Remove the radiator cap and fill 50/50 until the coolant level reaches the top ridge of the filler neck (not to the brim of the filler neck). Wait, and do this several times until the level stays there, with no more air bubbles.

.
- Start the engine (or have an assistant), the coolant level will quickly fall, so refill the radiator in the same manner, until the coolant level stays at the top ridge of the filler neck, and there are few if any air bubbles.


.
- Once the coolant level is consistent, reinstall the radiator cap, and check for any leaks around the heater hoses and such. Check and if needed, adjust the level inside the coolant reservoir tank to the proper level.
.
- Now pat yourself on the back for a job well done, and admire your work!
Please feel free to call, email or Pm us anytime with questions! | |
|
Shawn
Admin


Posts : 104
Join date : 2011-07-29
Age : 37
Location : Farmington, UT
| | Subject: Re: JDP Motorsports' 2010-11 SS Heater Hose 2012 Update DIY Wed Nov 30, 2011 11:34 am | |
| Awesome and very detailed write up! | |
|
NovemberNight
Just Joined


Posts : 2
Join date : 2011-11-30
Location : Hooper
| | Subject: Re: JDP Motorsports' 2010-11 SS Heater Hose 2012 Update DIY Wed Nov 30, 2011 12:09 pm | |
| I just saw this up close and personal last night. Looks very clean and nicely done. Something I am going to have to add to my list of to do's. | |
|
Sponsored content
| | Subject: Re: JDP Motorsports' 2010-11 SS Heater Hose 2012 Update DIY | |
| |
|